Published on March 12, 2023 | Posted in Front End
Changing the default validation message on an HTML input tag
Using HTML validation is a good extra protection for using server-side validation. However, I found the validation message used doesn’t always provide the user with enough context about what is wrong with the issue. I’m going to describe how to change this message.
First, we create a standard input where we ask for a username for a user.
<input id="username" type="text" name="username" /> Now we will add the required attribute to the form
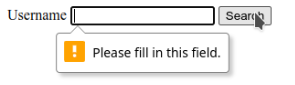
<input id="username" type="text" name="username" required /> This is the standard message which the browser returns. “Please fill in this field”
To change the validation message we will be using the oninvalid attribute. We will then use the setCustomValidity method. To create our own validation message. In this case, it will be “Please fill in your username”
<input id="username"  type="text" name="username" required
oninvalid="this.setCustomValidity('Please fill in your username')" /> html
As you can see from the screenshot below the error message is more help for the user rather than the stock browser message which is returned.

The links below from MDN go into further details how you could set this attribute from within a Javascript function rather than on each input.
https://developer.mozilla.org/en-US/docs/Web/API/GlobalEventHandlers/oninvalid
https://developer.mozilla.org/en-US/docs/Web/API/HTMLObjectElement/setCustomValidity